Abaculator (ABAcus + calCULATOR)
Jul 31, 2023A basic calculator with abacus visulisations and sounds 🧮.
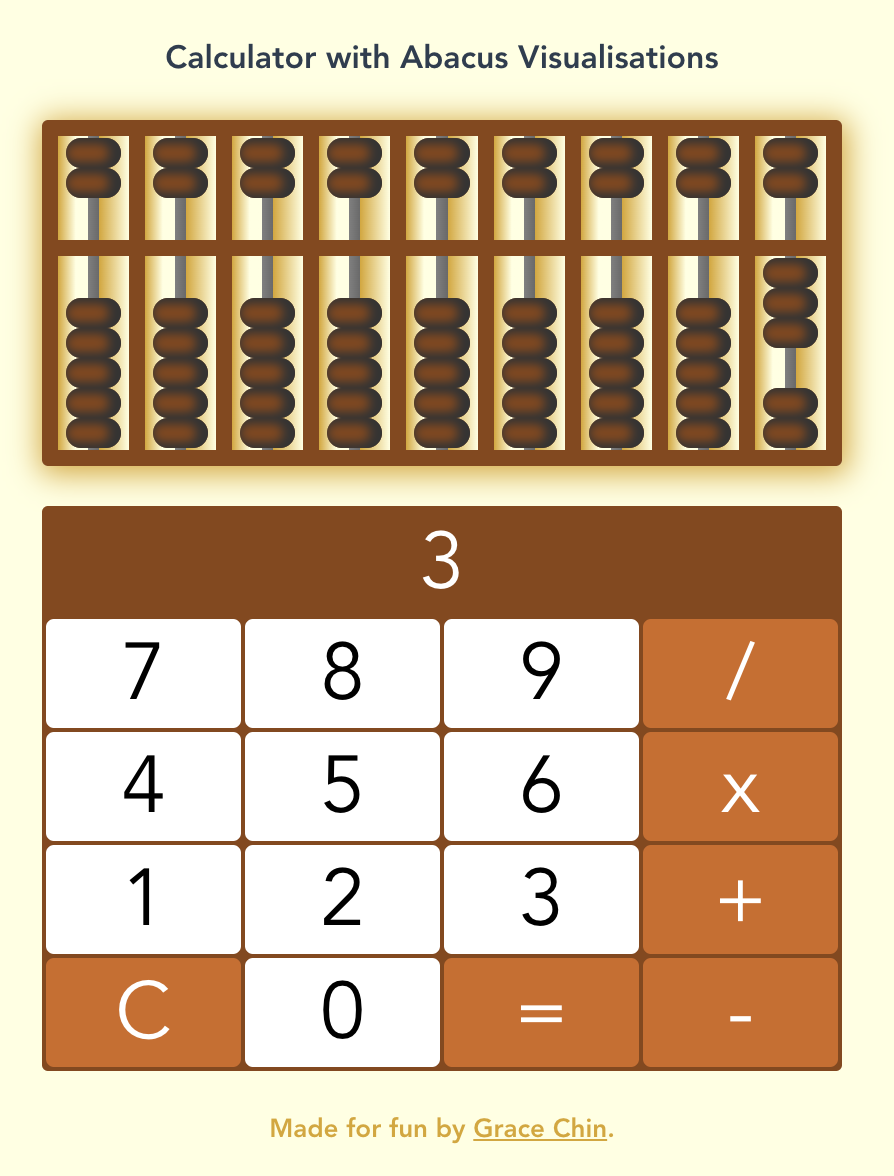
The main idea behind abaculator is to spark the curiousity of visitors by giving them a glimpse of an abacus working in parrallel with the modern calculator. The abacus visulisations don't accurately show how the abacus performs different mathematical operations, but just representations of the whole numbers entered in the calculator.
The inspiration for this project stems from my awe for the Chinese abacus, also known as the "calculating tray". This ancient counting tool is constructed from a rectangular wooden frame, featuring two decks. The upper deck comprises of two beads, while the lower deck contains five beads. Even though calculators have replaced the abacus in most scenarios, it is still being used for calculations to this day.
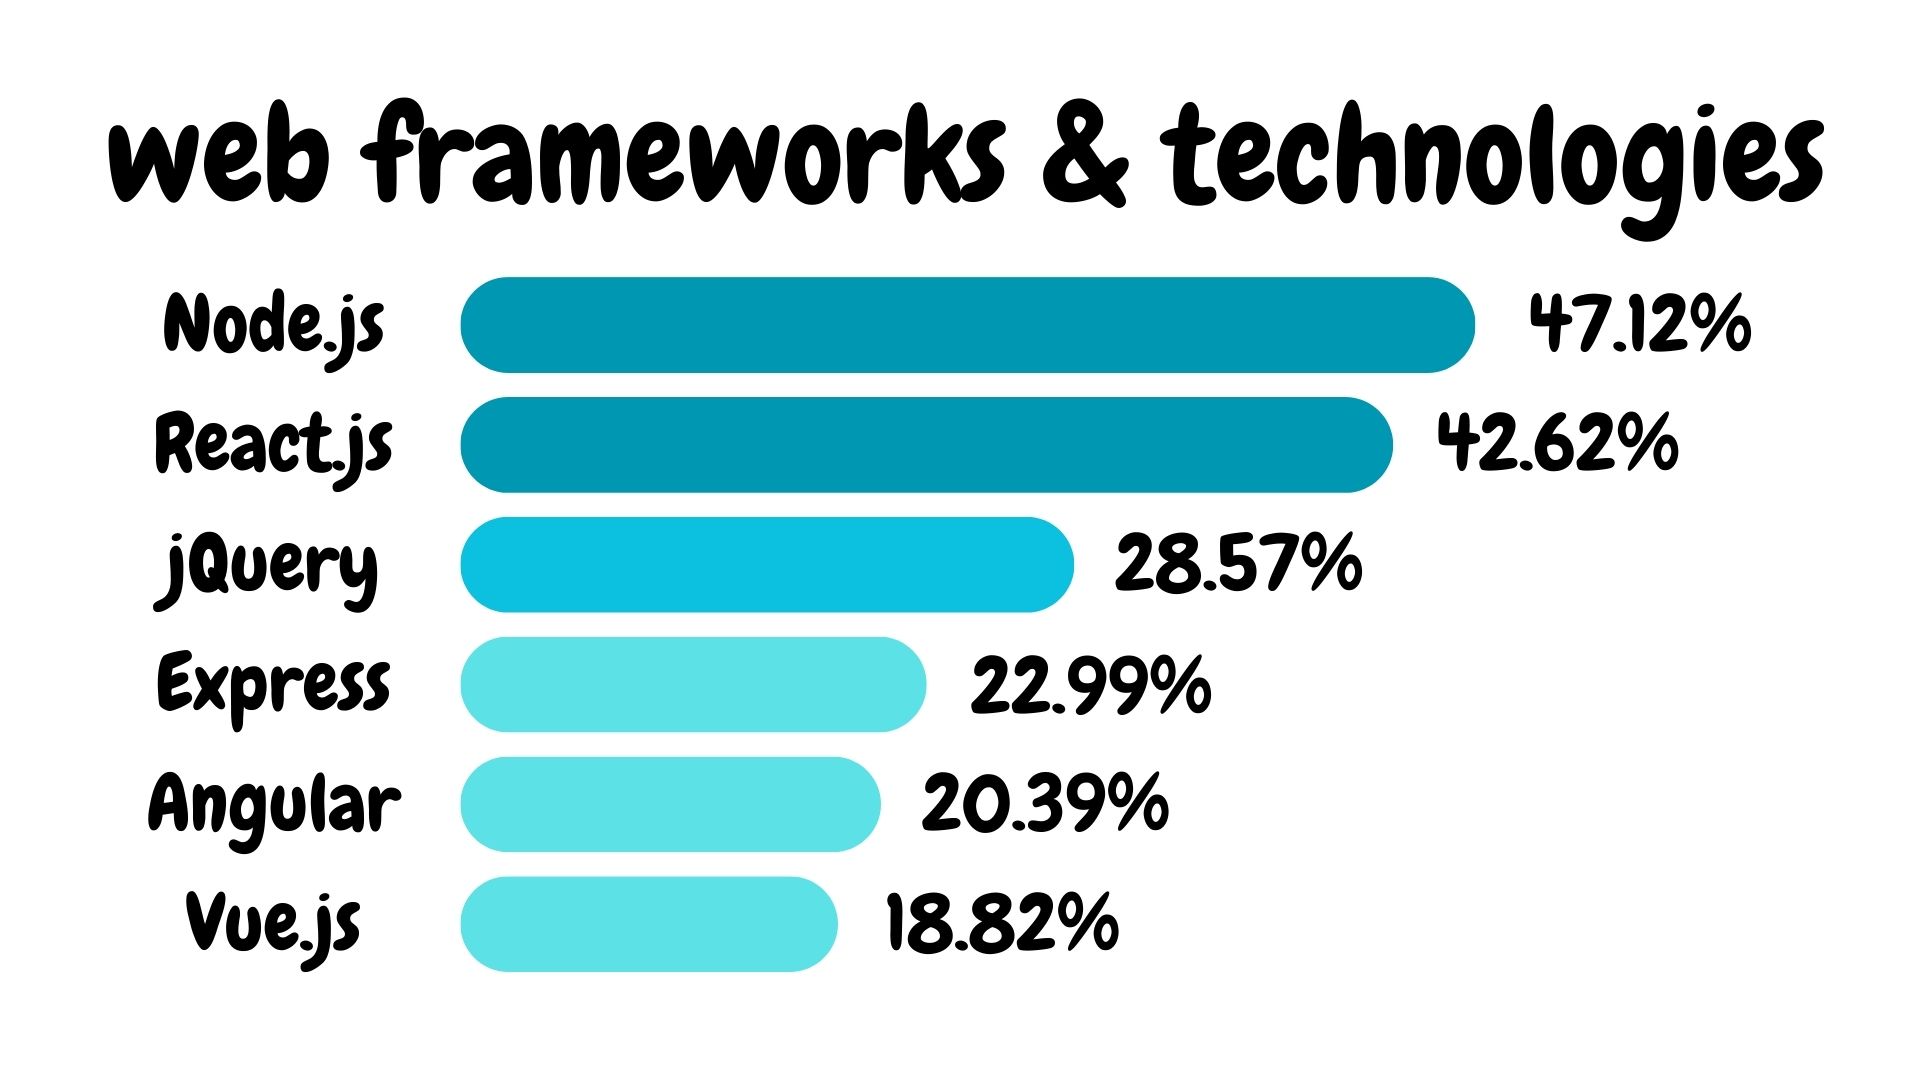
In this project, I used VueJS for the first time. It is a "progressive JavaScript framework" that was first released in 2014. A 2022 Stack Overflow survey revealed that 18.82% of respondants used VueJS. While it is not as popular as React, I still wanted to give it a go and see what it is like. From what I read, it is quite easy to learn especially since I already have a bit of experience with React.
Building the Calculator
To create a calculator component, I followed two Youtube tutorials, "Build a Calulator with Vue.js" (thank you freeCodeCamp.org!) and "Build a calculator app with VueJS" (thank you Programmer Notes!).
In Vue, single-file components (file extension .vue) have three parts:
- the
<template>section, which uses an HTML-based syntax to enable data-dependent DOM rendering. - the
<script>section, which uses JavaScript and is responsible for handling data manipulation and states, as well as importing components. - the
<style>section, which uses CSS. Thescopedattribute can be added to specify that the CSS only applies to the current component.
<!-- example_vue_single_file_component.vue -->
<template>
  <div class="example">{{ msg }}</div>
</template>

<script>
  export default {
    data() {
      return {
        msg: "Hello world!",
      };
    },
  };
</script>

<style>
  .example {
    color: red;
  }
</style>
To create the calculator buttons, I used Vue's built-in v-for directive to render the div block multiple times. The calculatorElements array contains the content of the buttons, which includes numbers and operators such as 7, 8, 9, /, 4, 5, 6, x, 1, 2, 3, +, C, 0, =, and -.
The :class attribute binding was used to conditionally render the operator CSS class, allowing the operator buttons to be a different color than the number buttons.
<!-- Calculator.vue -->
<div
  class="button"
  v-for="n in calculatorElements"
  :key="n"
  :class="{ 'operator': ['/', 'x', '+', 'C', '=', '-'].includes(n) }"
  @click="action(n)"
>
  {{ n }}
</div>
To handle the click effects, I used a v-on event listener to trigger the action method. Within the v-for loop, I passed the looped item directly into the action method, which made it very convenient to handle the effects when different buttons were clicked. It was a straightforward process to handle the click events and execute the necessary actions based on the button that was clicked.
Building the Abacus
Unlike the calculator component, the abacus component was created from scratch without a tutorial. I mainly used a combination of SASS mixins and Vue built-in directives and bindings.
To render the multiple columns of the abacus, I used the v-for directive. Each column consists of an upper deck <div class="deck-upper"> and a lower deck <div class="deck-lower">. Within each deck, I used another v-for to render the beads for the upper and lower decks.
<!-- Abacus.vue -->
<div
  class="col"
  v-for="(val, idx) in this.$store.state.abacusArr"
  :key="idx"
  :class="`col-${val}`"
>
  <div class="deck deck-upper">
    <div class="bead" v-for="upperBead in 2" :key="upperBead"></div>
  </div>
  <div class="deck deck-lower">
    <div class="bead" v-for="lowerBead in 5" :key="lowerBead"></div>
  </div>
</div>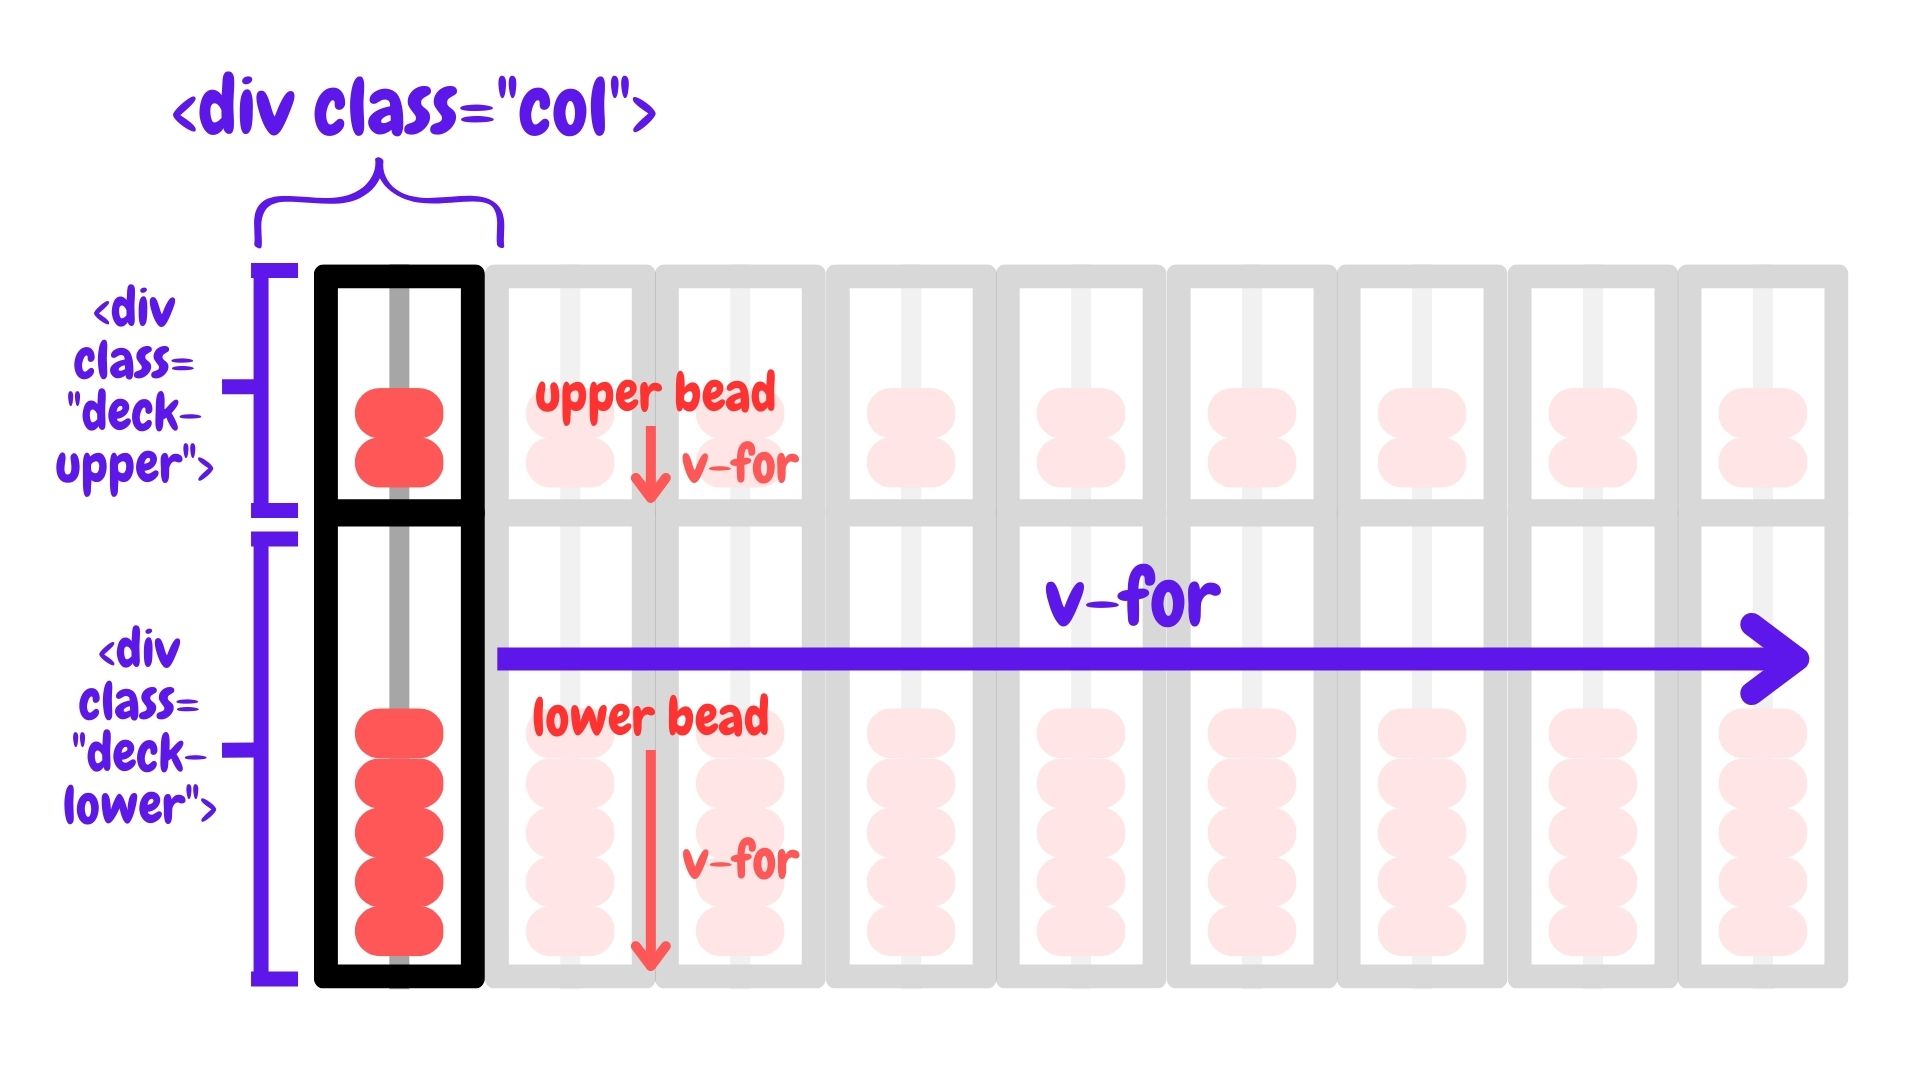
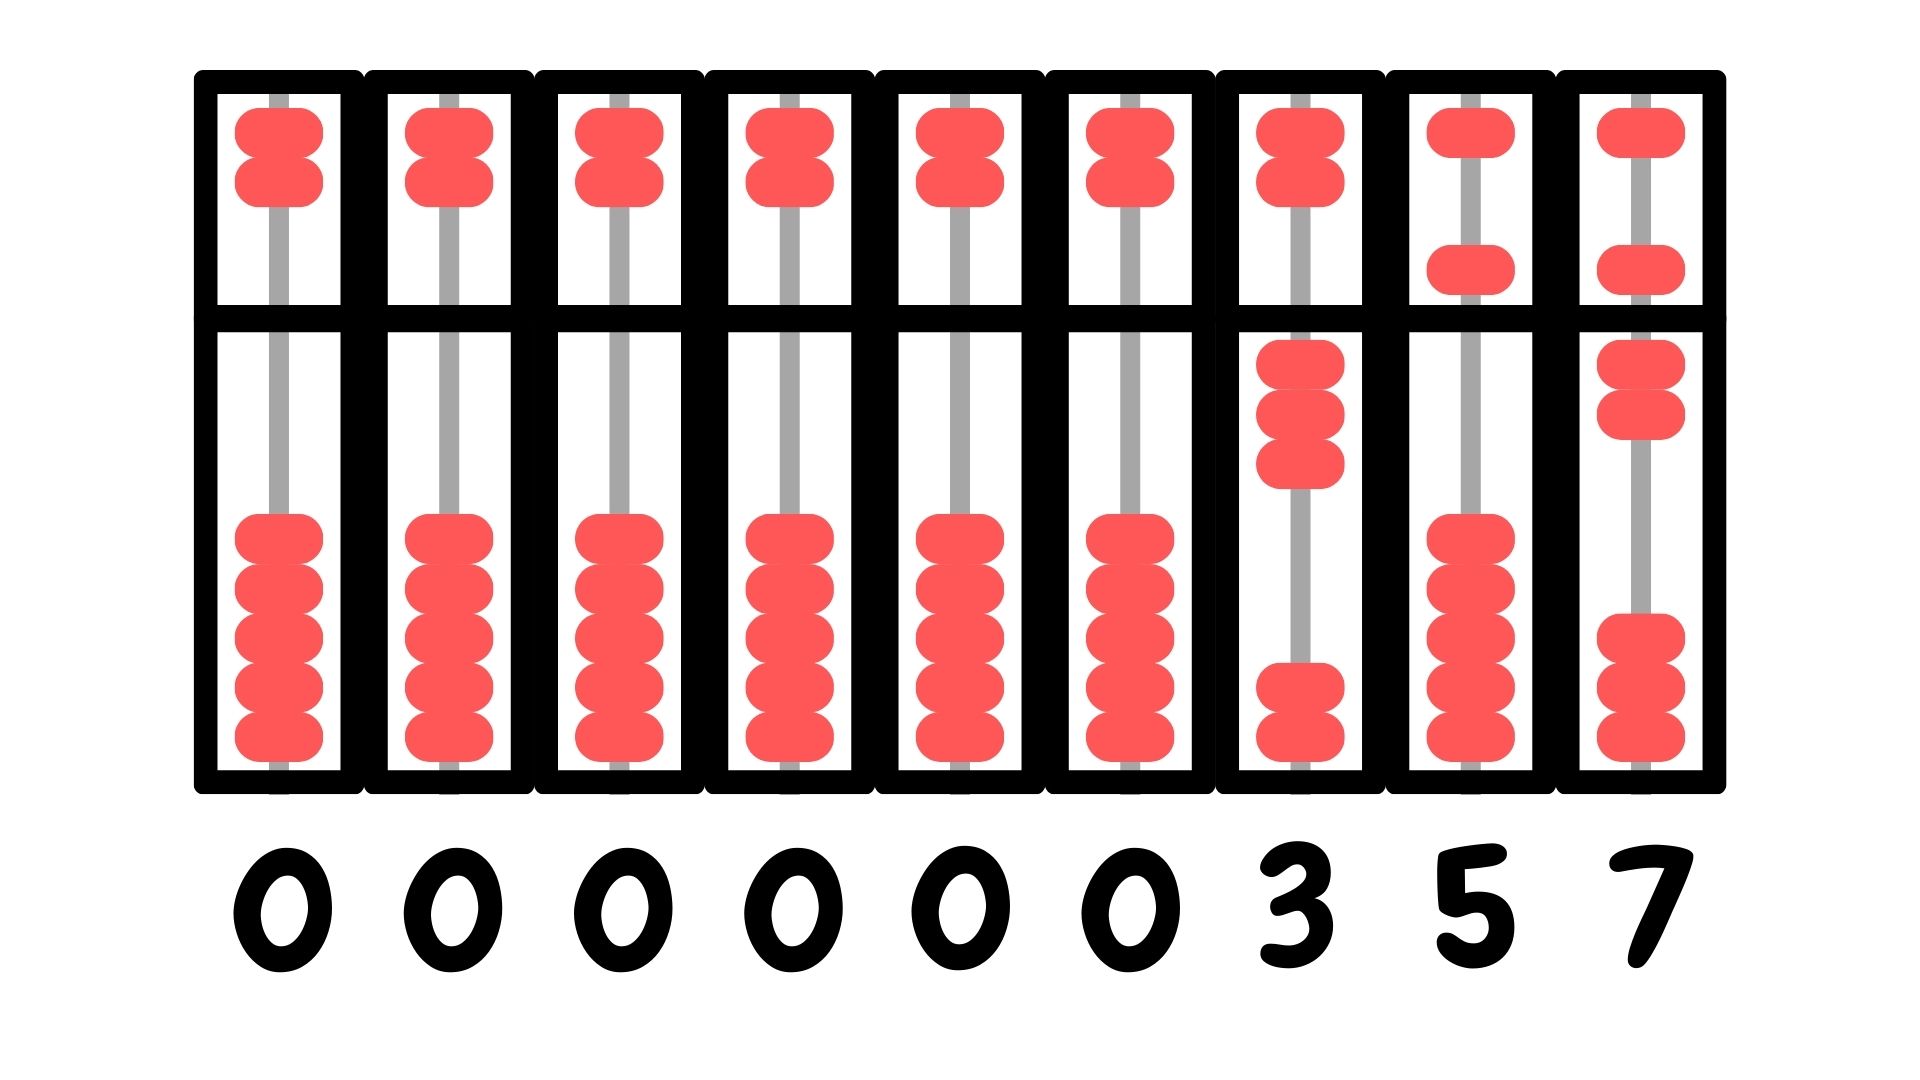
In an abacus, each column represents a digit of the displayed number, which means that the state of the abacus can be defined using an array of digits. For example, if the number displayed on the abacus is 357, the rightmost column would represent 7, the column to the left of it would represent 5, and the column two spaces to the left of it would represent 3. Therefore, the abacus state for this number can be represented as [0, 0, 0, 0, 0, 3, 5, 7], where each element in the array corresponds to the digit represented by a particular column in the abacus.
Each column in an abacus represents the possible digits 0-9 using different bead configurations. To achieve this in my abacus component, I utilized SASS CSS @mixins to define the possible bead configurations for each digit.
The activate-deck-beads mixin was used to translate the beads for the upper and lower decks. Meanwhile, the generate-col-beads-classes mixin was used to generate the classes for each digit, such that col-1 class configures the beads to represent number 1, col-2 class configures the beads to represent number 2, col-3 class configures the beads to represent number 3, and so on.
By using these mixins, I was able to easily generate the necessary CSS classes to represent the different bead configurations for each digit.
/* Abacus.vue */

$upper-deck: "upper";
$lower-deck: "lower";

@mixin activate-deck-beads($n, $deck) {
  @if ($n > 0) {
    @for $i from 1 through $n {
      @if $deck == $upper-deck {
        .deck-upper > .bead:nth-child(#{3-$i}) {
          transform: translateY($bead-gap);
        }
      } @else if $deck == $lower-deck {
        .deck-lower > .bead:nth-child(#{$i}) {
          transform: translateY(0);
        }
      }
    }
  }
}

@mixin generate-col-beads-classes() {
  @for $n from 1 through 9 {
    .col-#{$n} {
      $upper-value: math.floor(math.div($n, 5));
      $lower-value: $n % 5;
      @include activate-deck-beads($upper-value, $upper-deck);
      @include activate-deck-beads($lower-value, $lower-deck);
    }
  }
}
The class for each column is assigned using the Vue class binding :class="col-${val}"
Putting them together
To synchronise the calculator and abacus components, Vuex state management pattern and library was used. A store.js was created to store the states and mutations, which were imported into the components.
Thoughts?
This project was quite fun to execute. Although Vue is supposed to be straightforward to learn since I already know React, I found that the directives and class bindings took some getting used to. If I were to use Vue for a bigger project, I think I might need to make myself a little cheatsheet for those parts.
I am proud that I managed to execute the abacus to a certain extent. It was not obvious to me how I should have executed it (e.g. how much I should rely on SASS vs. Vue HTML-based directives). It would be interesting to see how other people would code up an abacus.
Anyway, that's all for now! Happy calculating and hope it sparks ✨ an interest in you to find out more about abacuses 🧮!